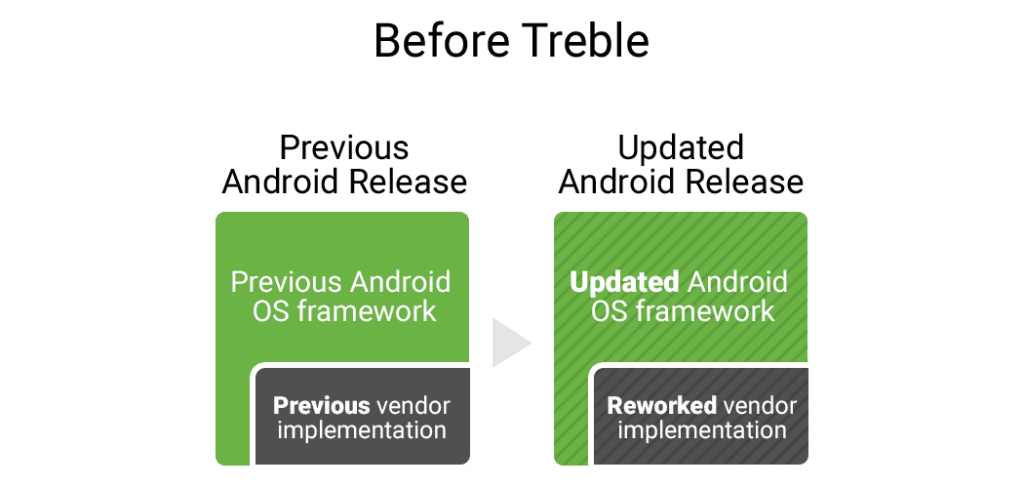
How to Install Android Q | Back in 2017, Android 8.0 Oreo introduced Project Treble and its one of the best things happened to Android OS in a while. Project Treble basically separates the Android Framework from the vendor image, thus enabling faster software updates for supported devices.

Now that the first Android Q Beta is available for pixel devices, developers are trying hard to extract/port the GSI image (generic system image). One such developer is “Erfan” who has successfully ported the GSI image from the Pixel 2 and this image will work on any Project Treble enable Android device.
So, if you’re impatient like I am and and you want to try out the new Android Q’s features, then you’re at the right place.
But before we get started to the actual process, the very first thing that you should keep in mind is that the process is a little bit different from installing a custom Rom. So, I would suggest you to follow the steps carefully.
Prerequisites :
- Your Android device should have an official/unofficial Treble support (if you are not sure if your device supports project treble, then you can use the treble check app to confirm that).
- You should have unlocked Bootloader, with a custom recovery installed like TWRP recovery.
- Make a full backup of your device since you have to fully wipe your internal storage.
- Your battery should be at least 60% charged.
How to Check Device Partition:
- The first step is to find your device partition-type. Now, basically there are 2 types of device partition in Android system. One is A-only and another is AB partition. Now I don’t wanna go in-depth regarding how they are different.
- So, to check your partition, download an app called Terminal Emulator for Android and type this command. “getprop ro.build.ab_update”
If this will return true, the device supports dual partitions which is AB partition. If not, it means your device has A-only partition.
Required Files:
- Android Pie GSI (According to your partition, meaning if your device supports A-only partition, then download A-only GSI file and same goes for the AB partition).
- permissiver_v2.zip
- FixZygote.zip
- Any Android Pie Based Rom like Mokee Rom, Lineage OS etc (we will be using this as a base Rom as it has full treble support built in).
- Google Play services APK (to fix Gapps after the device boots up)
Now that you have downloaded all the requited file, let’s begin the actual process.
Steps Involved: (How to Install Android Q)
- Power off your device and boot into TWRP recovery by using the specific key combination which includes power and volume button.
- Once you have successfully booted into TWRP recovery, click on wipe then format data, now type yes to format the data. (Now at this point if you haven’t backup your data then it will be erased. So, it’s better to make a full backup)
- Once done go back and reboot your device to recovery.
- Now connect your device to the PC via USB cable and transfer only the Android Pie based ROM to the internal storage of your device.
- Once done, click on install and flash the Rom zip file. It will take 2-3 minutes to flash the Rom, after that is done reboot your device.
- Now go through the initial setup of the Android Pie Rom.
- Now again boot your device into TWRP recovery and transfer the remaining files (i.e. Android Q GSI file, permissiver_v2.zip, FixZygote.zip and Google play services APK file.
- Once all the files are transferred click on wipe and swipe this blue button to right in order to wipe the system partitions.
How to install on AB:
- Click on install and flash permissiver_v2.zip
- Once done, go back and click on install then select install image and navigate the Android Q GSI file and flash it
- Now reboot your device
How to install on A-Only:
- Click on install and flash permissiver_v2.zip
- Once done, go back and click on install then select install image and navigate the Android Q GSI file and flash it.
- After that flash FixZygote.zip
- Now reboot your device
Now you are almost done just reboot the device and it will take around 5 minutes to boot up.
So, there you have it guys. I have tried my best to make this guide as simple as I can so anyone with no past experience of flashing Roms can follow this method to install Android Q on their treble enabled devices.
If you followed everything accordingly, then you should have the latest Android Q on your device in all its glory! Once you boot up into the system, set everything up, avoid any force closes or error messages, and proceed to install the Play Services and Camera APKs to make the ROM a daily driver! If you had any issues regarding the procedure, hit us down in the comments below, we’d be glad to assist you!

